🌱 Introduction
Microgreens might look tiny, but their journey from seed to harvest is nothing short of magical.
In just 7 to 14 days, these vibrant greens go through an incredible transformation — from dormant seeds to living nutrition powerhouses.
If you’ve ever wondered how these mini-plants grow so fast or when exactly they’re ready to harvest, this guide will walk you through every phase of the microgreen life cycle — simple, fascinating, and full of growing wisdom!
🌾 Stage 1: The Seed — The Beginning of Life
Every microgreen starts with a tiny seed, packed with potential energy.
At this stage:
The seed is dormant, waiting for the right conditions — moisture, warmth, and darkness — to wake up.
It contains everything needed to kickstart growth — nutrients, stored energy, and genetic code.
🔹 Pro Tip:
Use high-quality, untreated microgreen seeds to ensure strong germination and safe consumption. Avoid seeds meant for field crops as they may be chemically treated.
💧 Stage 2: Germination — The Awakening
Once you sow your seeds and mist them with water, the germination phase begins — usually lasting 2–4 days.
Here’s what happens:
The seed absorbs water (a process called imbibition).
Its outer shell softens and splits open.
The radicle (root) emerges first, anchoring into the soil or grow medium.
The shoot starts pushing upward, searching for light.
During this time, it’s crucial to:
✅ Keep the seeds moist but not soaked.
✅ Maintain darkness with a cover or blackout dome.
✅ Ensure warmth (around 20–24°C or 68–75°F).
🌤️ Stage 3: Early Growth — Reaching for the Light
After germination, it’s time for your microgreens to meet the light! ☀️
This stage (days 4–7) is when growth speeds up dramatically:
The shoots grow upward and turn green as photosynthesis begins.
Roots spread and strengthen to draw nutrients and moisture.
The plants begin forming cotyledon leaves — their first “baby leaves.”
These cotyledons store nutrients that help fuel rapid development before true leaves appear.
💡 Tip for Beginners:
Place trays under LED grow lights for 12–16 hours a day, about 6–12 inches above the plants. Rotate trays daily for even light exposure.
🌿 Stage 4: True Leaves and Maturity
By day 7 to 14, depending on the variety, microgreens begin to develop their first true leaves — the small, defined leaves that resemble mature plant foliage.
This stage marks peak nutrition and flavor.
Broccoli and kale taste mildly sweet and nutty.
Radish greens develop a peppery bite.
Pea shoots become tender and crunchy.
This is also when color and aroma become more pronounced — a sign that they’re bursting with life and nutrients.
✂️ Stage 5: Harvest — The Perfect Moment
The best time to harvest microgreens is when they are 2–3 inches tall and have their first true leaves.
How to Harvest:
Use sharp scissors or a knife.
Cut just above the soil line — don’t pull the roots.
Collect gently and rinse in cool water.
Pat dry completely before storing.
Storage Tips:
Keep in an airtight container lined with a paper towel.
Store in the refrigerator for up to 7 days.
Always dry thoroughly to prevent mold or spoilage.
🌻 Bonus: Regrowth — Can You Regrow Microgreens?
Most microgreens do not regrow after harvesting because they’re harvested too young. However, varieties like pea shoots and wheatgrass may give a second smaller crop if left rooted and watered.
For the best results, it’s usually better to start fresh with new seeds and soil for every batch.
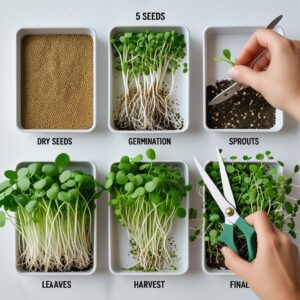
🌞 The Full Life Cycle at a Glance
| Stage | Timeline | What Happens | Care Tips |
|---|---|---|---|
| Seed | Day 0 | Seed is dormant | Store in cool, dry place |
| Germination | Days 1–3 | Root & shoot emerge | Keep dark & moist |
| Early Growth | Days 4–7 | Cotyledons develop | Add light, avoid overwatering |
| True Leaves | Days 7–10 | Photosynthesis, leaf formation | Ensure air circulation |
| Harvest | Days 10–14 | Ready to cut & enjoy | Harvest above soil line |
🧠 Fun Fact:
Microgreens can have up to 40x more nutrients than mature plants! They’re rich in vitamins C, E, K, and beta-carotene, making them a true superfood in miniature form.
🌿 Conclusion
The life cycle of a microgreen is short but powerful — from a tiny seed to a nutritious harvest in under two weeks!
Understanding each stage helps you grow healthier, tastier, and more vibrant microgreens at home.
So grab your trays, seeds, and a little patience — and start your next batch with confidence. Every tray is a new life cycle waiting to unfold 🌱