🌿 Introduction
Imagine having fresh, nutrient-packed greens growing right in your kitchen — ready to harvest in just 7–14 days. Sounds amazing, right?
That’s the magic of microgreens — tiny plants with mighty nutrition. The best part? You don’t need a garden, fancy equipment, or even much space. With a simple DIY indoor setup, you can grow your own superfoods all year long!
In this guide, we’ll walk you step-by-step through creating your own microgreens growing station — perfect for beginners who want to eat healthier and grow sustainably.
🪴 Why Grow Microgreens Indoors?
Before we jump into setup, let’s see why indoor microgreens are such a great idea:
🌱 Year-round growth: No weather worries or seasons to wait for.
🍽️ Nutrient boost: Microgreens contain 4–40x more nutrients than mature plants.
💰 Budget-friendly: Grow your own for a fraction of store prices.
🌍 Eco-conscious: Reduce food miles and packaging waste.
🏠 Small-space friendly: Perfect for apartments or small kitchens.
⚙️ What You’ll Need for a DIY Microgreens Setup
Creating your microgreens station doesn’t require much. Here’s a quick checklist:
1. Growing Trays
Use shallow trays (1–2 inches deep).
👉 Tip: Choose trays with and without drainage holes — one for watering from below.
2. Growing Medium
You can use:
Organic potting soil
Coconut coir
Hemp or jute mats
Each works great — just ensure it’s clean and chemical-free.
3. Quality Microgreen Seeds
Start with beginner-friendly varieties:
Broccoli 🌿
Radish 🔴
Pea Shoots 🟢
Sunflower 🌻
Mustard 💛
4. Light Source
If natural sunlight is limited, use LED grow lights.
👉 Pro Tip: Place them about 6–12 inches above your trays and keep them on for 12–16 hours daily.
5. Spray Bottle & Watering Tray
A spray bottle helps with gentle misting during germination.
After sprouting, switch to bottom watering to avoid mold.
6. Blackout Lid or Cover
During the first few days, seeds need darkness to germinate. A second tray or cardboard lid works perfectly.
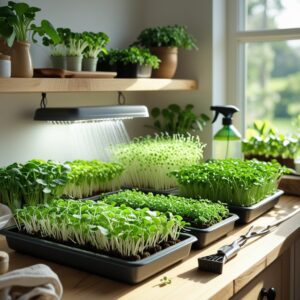
🌱 Step-by-Step: Setting Up Your Indoor Microgreens Station
Step 1: Prepare Your Tray
Fill your growing tray with about 1 inch of soil or growing medium. Smooth it evenly but don’t pack it too tightly.
Step 2: Sow Your Seeds
Sprinkle seeds evenly across the surface — not too thick! Gently press them into the medium.
Step 3: Mist and Cover
Spray lightly with water until the medium is moist, not soaked.
Cover with another tray or lid to create a dark, humid environment for germination.
Step 4: Germination (Days 1–3)
Keep trays in darkness for 2–4 days. Mist lightly twice a day.
You’ll start seeing tiny sprouts emerge! 🌱
Step 5: Light and Growth (Days 4–10)
Once most seeds have sprouted, remove the lid and place trays under light.
Water from below using your drainage tray. Maintain good airflow to prevent mold.
Step 6: Harvest Time! (Days 7–14)
When your microgreens are 2–3 inches tall and have their first true leaves, they’re ready to harvest!
Use clean scissors to cut just above the soil line.
🧺 How to Store and Enjoy Your Harvest
Rinse lightly and dry completely before storing.
Keep in an airtight container lined with a paper towel in the fridge.
Stays fresh for up to a week!
💡 Try This: Add microgreens to salads, sandwiches, smoothies, or even soups for a fresh flavor and nutrition boost.
💡 Optional Add-Ons for a Pro Setup
If you want to level up your DIY setup, consider adding:
🌞 Timer-controlled grow lights (automates lighting cycles)
💨 Mini fan (improves air circulation)
🌡️ Thermo-hygrometer (monitors temperature and humidity)
🧑🌾 Stackable trays or shelving units (saves space and increases yield)
🌸 Common Mistakes to Avoid
Overwatering (causes mold)
Poor lighting (leads to leggy growth)
Overcrowding seeds
Skipping cleaning between batches
👉 For more details, check out our post: [Beginner Mistakes to Avoid When Growing Microgreens]
🌿 Conclusion
Setting up a DIY microgreens garden is simple, affordable, and incredibly rewarding. With just a few supplies and a little care, you can grow fresh, organic superfoods right on your kitchen counter — anytime of the year!
Whether you’re doing it for health, sustainability, or pure joy, growing your own microgreens is one of the easiest steps toward a greener lifestyle.
Start today — your body (and taste buds) will thank you! 💚